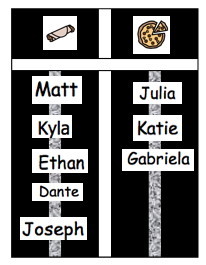
This tip is all about making authentic choices, and name recognition. Students get to vote for real purposes, such as choosing lunch, deciding who to invite for a class visit, or which video to watch during Friday Fun. They can also vote to show knowledge, such as whether frogs are reptiles or amphibians, respond to true/ false questions, and give opinions. Each student finds his or her name from a field of 3 - 10 names, and uses it to place their vote. While these activities are currently happening in classrooms for students with significant cognitive disabilities, this tip is a reminder to increase the cognitive engagement, and use the strategy across more activities.
AAC Intervention
916 West Castillo Drive
Litchfield Park, AZ 85340
Don't throw away your page-a-day calendar! Save the plastic frame and use them as book holders. These work especially well for small board books. It helps to keep your hands free to hold your child and model communication board use!
This great tip came from a presentation I attended at Closing the Gap in Minneapolis a few years ago. I apologize for not being able to cite the exact source.
If you know who originated this idea, please let me know so they can be given proper credit!
Props add an extra dimension of hands-on fun for students of all ages. These can be simple line drawings that correspond to a book or rhyme. The nursery rhyme book currently being developed will contain props for each rhyme. See the example below.
For students who have fine motor difficulties, mount your props on foam core board and put velcro on the back. Foam core board is the material used when matting pictures. It is available at places such as Wal-Mart. If you are lucky enough to know someone in the framing business, ask them to save their scraps for you.
Creative Educational Surplus offers some excellent velcro sensitive story boards and books. If you use symbols and velcro - their products are a must!!!
A great print resource for props can be found on p. 335 in the book Emergent Literacy Success: Merging Technology and Whole Language for Students with Disabilities by Caroline Musselwhite & Pati King-DeBaun. Check this out at: Creative Communicating.
The AAC system is their voice
When interacting with an individual who is using an augmentative communication system, keep in mind that the system is their voice. Respond therefore to their communication attempts rather than to their physical action of activating a switch or pressing a button. For example, if a person has just used a single message system (e.g. BIGmack) to say "turn the page", respond by turning the page and saying "Yes, let's turn the page". Do this as opposed to saying "good hitting the switch".
Ideas for single message system messages:
Turn the page
Read that again
Bet you can't catch me!
Tickle Me!
Rub my back!
Sing (favorite song)
Do that again!
Swing me!
Peek-a-boo
Intonation is a critical component in the recording of these messages! Sound upbeat and excited. Make your enthusiasm contagious!
Highlighting tape is a transparent tape with a post-it note type adhesive which makes it easily removable. We have used it to highlight things such as the repeated line in a story and the corresponding message location on a communication system. It has also been used to provide a visual cue to emergent readers and/or individuals who have a left sided neglect to begin their reading at the left side of the page. One parent I showed it to intended to use it to highlight important phone numbers for her daughter in their city telephone book.
Highlighting tape can be used in library or other borrowed books as it can be removed without leaving any marks! It comes in a variety of widths including: 1/2", 1/6", 1/3" and 1 7/8".
Highlighting tape is manufactured by Lee Products of Minnesota and sold through a variety of sources including the Wisconsin Assistive Technology Initiative. It is also sold through:
Crystal Springs Books: Professional Books for Elementary Educators
Ten Sharon Road
P.O. Box 500
Peterborough, NH 03458-0500
1-800-462-1478
Their catalog is worth checking out! It contains a variety of emergent literacy resources for teachers including books by Patricia Cunningham and Marie Clay. Call today for your free catalog!
This month's tip comes from Joan Turnquist, SLP in the Owen, WI schools.
For individuals who have a difficult time grasping flat symbols, attach your communication pictures to a square of styrofoam like the type used for baked goods. Cut the styrofoam platter so that you include one side of the raised portion of the plate. This provides a raised lip for students to grasp. According to Joan, it made all the difference for one of her students who could not pick up a single dimensional symbol. Symbols can be attached using velcro, paper clips, or glue.
Additional Note: If using velcro, remember to follow the "velcro rule" of placing the soft velco on the surfaces where individuals will touch and the hook velcro on the backs of symbols. This consistency will pay off in being able to interchange symbols between activities when necessary without having a velcro mismatch!
Thanks Joan! If anyone else has tips to share, please send them on using our Contact Us link at the top of the page.
Taking Screen Shots on a computer What are they? Screen shots allow you to take a "picture" of anything you can see on your computer screen (e.g. your desktop, graphics on the web, any software program). Note: Be sure to check out copyright restrictions.
Why use them? To provide realistic picture representations for communication boards and/or computer activities.
How? On a Macintosh: In the following order, press and hold: Shift - Open Apple - 3. You will hear a sound like the shutter of a 35 mm camera. Screen shots are saved on the hard drive and titled "Picture 1", "Picture 2" etc. in the order you take them. Print the screen shots directly or crop and copy only the portion you wish to use.
Using Windows: Press and hold the Alt key then the Print Screen key. You will not hear any sound. Screen shots are saved to the clipboard. Open the Paint program in your Accessories folder). Paste the picture. Crop, copy and/or save.
Next?
Screen shots can be imported to and saved in other programs such as BoardMaker or IntelliPics. For detailed instructions on using Screen Shots with BoardMaker, see the Mayer-Johnson Co. Tip of the Month for November 1998 at: http://www.mayer-johnson.com/tipstuts/TOM0899.html
Screen shots can be imported into instruction sheets that you would leave for others as to how to enter, run and exit a particular program. For example, in a school setting you could leave instruction sheets for other staff as to how to enter, use and exit specific software programs.
IntelliTools - manufacturer of the IntelliKeys, IntelliPics, Overlay Maker, and Click It - has a FREE activity exchange at their web site: www.intellitools.com. Activities are available for both Mac and Windows. The database of activities is searchable by age range, product and curricular area. There are a wealth of ideas awaiting you!
Creating age-appropriate cause and effect type activities for older students is often a challenge. These instructions assume you have a working knowledge of IntelliPics. If you do not, check out the excellent training materials on the IntelliPics web site.
To create a switch accessible music activity: - choose a tape or CD which is popular with the individual's same age peers
- decide what portion of the lyrics will be assigned to each IntelliPics frame
- choose a picture from the IntelliPics library, import from BoardMaker or use a screen shot as described in last month's tip of the month
- when it comes time to record a message, place your tape or CD player near the microphone of your computer. Have the music cued to the portion you wish to record. Press "record" under the digitized speech menu of IntelliPics while you press "play" on your tape or CD player. Press "stop" as soon as the portion of the lyrics you want is finished.
- Under the "Advanced" (Macintosh) or "Extras" (Windows) option of your IntelliPics program, use the caption feature to type in the lyrics corresponding to what you just recorded.
Note:This will also work with music written for younger age groups. Be conscious of copyright issues.
When it came time to remodel her room, my friend and colleague Lori Tufte had the maintenance person at her school install rain gutters below all the chalkboards. This made the perfect place to store books so they were within easy reach of small hands and arms. This was a great way to make emergent literacy materials accessible to her students!
September 1999 Downloading Computer Software to Video
This month's tip is from Caroline Musselwhite. Thanks Caroline! Not only is this a great way to create a home-school link, it is also a wonderful idea for those having to give presentations who don't want to deal with computing at the same time!
Downloading Computer Software to Video
GOAL:Take any software and "download" it to a VHS so kids can see it
at home (obviously, you need to have the copyright on this software, but
you can do this with anything you make!)
MATERIALS:
Mac A-V Card or G3 AV Ready
Cables - yellow & white phone plugs on both ends
(I decided to just try the cables that came with my videocamera -
Voila! They worked!)
VCR with audio and video in ports (must be near computer)
PROCEDURE: 1) Attach cables from Audio Out port on computer to Audio In port on
VCR, from Video Out port on computer to Video In port on VCR
*note* - I had to get an adaptor from Radio Shack to make this work - it
converted from Phone Plug to stero mini plug - I just took the cable
into Radio Shack and told them what I wanted to do in my best Southern
accent and it worked!
2) Pull up the software you want to use on your computer (e.g.,
IntelliPics Cash for Trash)
3) Put a blank tape in your VCR and turn on VCR
4a) PowerMac Instructions: Go into Control Panels, Monitors, Options -
select Display Video on Television - your computer monitor will go blank
(gasp!)
Here's the tricky part - makes my little heart go pitter patter just to
think about it!
I typically press every button on my TV/VCR handset until I find the
right one, and just tried them all to figure it out - then I remembered
that I DID put this on my computer - press on your remote
handset, and it should show the computer screen on your VCR monitor.
4b) G3 Instructions: Open Control Tab on bottom left of monitor; choose
Monitor icon; select ; you will get a message
telling you to be sure a tv monitor is connected - you may have to
select on your TV remote handset (see 4a, above); if you see the
picture on your monitor, select OK and you will see the picture on your
computer AND on your TV monitor.
5) Press on your VCR, then immediately start running the
desired program on the computer. When finished, press on your
VCR, rewind and see if it worked, redo if necessary, until you have what
you want.
Good luck! Let me know how it goes (remember, if you have a TechnoAce
with you when you try this, it will be FAR less stressful!)
This month's tip is from Penny Reed, Director of the Wisconsin Assistive Technology Initiative. Thanks Penny!
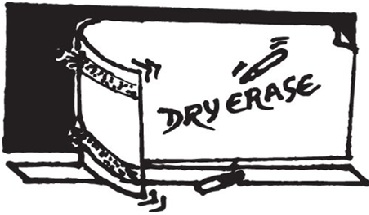
Contact paper is now available in a wipe-off surface version. Using this product, you can make your own wipe off boards out of almost anything! For example, cut a piece of cardboard to a size that would be convenient to carry or place on a corner of a student's desk. Cover it with the contact paper and viola! - you now have a portable wipe-off board. This would be great for students who can read and need visual reminders of schedules, activities within a routine and/or "to do" lists.
Note: Contact also makes an eraseable blackboard contact paper as well!
Check your local WalMart stores for this great product!
November 1999 Reuseable IntelliKeys Overlays
Musselwhite & Maro, 1999
Make reuseable IntelliKeys overlays by first printing an overlay template. For example, use the overlay templates from the I Can Write series available through the activity exchange at the IntelliTools website (www.intellitools.com).
Why?
To save time and resources by eliminating the need to print out every new overlay you make.
How?
Using clear tape (e.g. packaging tape), attach two clear transparency sheets to the bottom of the overlay. ( Note: You may need to attach an extra piece of transparency at one end as the IntelliKeys overlays are legal size and most transparency sheets are letter size.)
Using an overhead marking pen, write your target words/phrases/sentences on the first transparency sheet.
Cover with the second transparency sheet to prevent the marker from coming off on your fingers
You will still need to make programming changes within Overlay Maker to reflect what you have written on the transparency sheets but you won't need to print them out.
Copyright Reference
The September 1999 issue of Technology & Learning carried an article titled: The Educators' Lean No Fat Guide to Fair which discusses issues of copyright and fair use. It is an excellent resource for anyone with questions regarding copyright issues. For more information, see www.techlearning.com.
At Closing the Gap this year, I attended two excellent pre-conference workshops with ideas on adaptations for students who struggle with writing. These included: Write On, Write Now! Supporting Early Writing Across the Curriculum presented by Caroline Musselwhite and Gretchen Hanser and Finding the Right TWIN presented by Judith P. Sweeney. The following idea was presented in both of these sessions.
What?
Students who struggle with writing can provide fill-in-the-blank type answers using pre-printed address labels.
Why?
To reduce the student's struggle with writing tasks and free them to focus more on the cognitive requirements of the activity.
How?
Examine the student worksheet, activity or assignment and make a list of the vocabulary they will need to complete it.
Use a label program such as those designed to create mailing labels. Judy Sweeney recommended MacEnvelope for an approximate cost of $39.95
Instead of entering an address as you would for a label, type in the word (or words) that the student would need to complete a particular worksheet or assignment.
Print the labels and have the student use these to place their answers on paper.
Clear labels (as opposed to those with a white background) are more expensive but may work better on worksheets where the fill-in-the-blank portion is small.
Students may need some assistance with removing labels. For example, part of the backing could be peeled away making label removal easier.
More?
MacEnvelope allows you to specify the color of the word. Thus, you could use color-coding such as that suggested by Goossens', Crain and Elder.
If your label programs allows you to import a picture, try bringing in BoardMaker images as appropriate.
To contact Judi Sweeney for more information e-mail: jsweeney@snet.net
The idea guy has a link to the Avery Software site where you can obtain other label making products.
Our little idea guy marks the tip attachments. They are posted in pdf format. On the few occasions where there was more than one document to attach, we have "zipped" the files.
PDF File Information
If you don't have Acrobat Reader on your computer, go to the following site: http://get.adobe.com/reader/


 Don't throw away your page-a-day calendar! Save the plastic frame and use them as book holders. These work especially well for small board books. It helps to keep your hands free to hold your child and model communication board use!

![[IMAGE]](/home/180009852/180009852/images/itsybi_2.jpg)


 For individuals who have a difficult time grasping flat symbols, attach your communication pictures to a square of styrofoam like the type used for baked goods. Cut the styrofoam platter so that you include one side of the raised portion of the plate. This provides a raised lip for students to grasp. According to Joan, it made all the difference for one of her students who could not pick up a single dimensional symbol. Symbols can be attached using velcro, paper clips, or glue.


 This month's tip is from Penny Reed, Director of the Wisconsin Assistive Technology Initiative. Thanks Penny!


